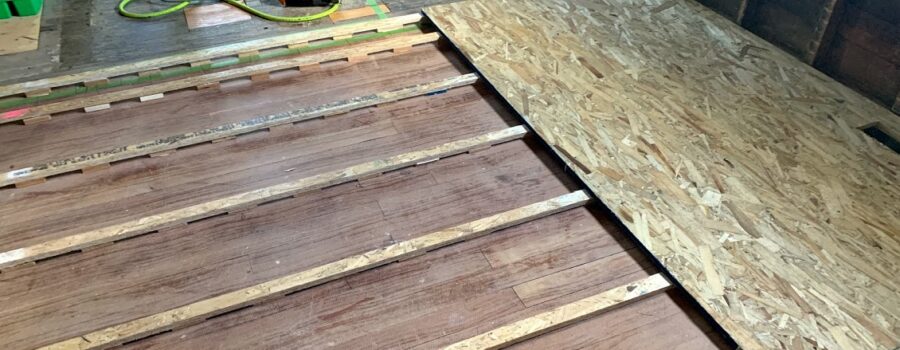
When I started work on the house, I noticed that the floor wasn’t level. I thought I could level them pretty easily by jacking up the floor joists. There is easy access to the joists from the basement.
After I pulled up the flooring, I realized that this was going to be a MAJOR project. There were multiple issues. First, the ceiling is level. So, if I jack up the floors, I also jack up the wall… which make the ceilings out of whack. Second, some of the rooms are WAY out of level. They vary as much as 2 1/2 inches over 10 feet. (Just about enough to make a decent ski slope.)
I did some extensive Google searching but was unable to come up with a method that I thought would work well.
As I write this blog, I have completed about 200 square feet of floor leveling. I have a ton more to do but I’m extremely happy with how it is going.
Step 1 – Find the highest spot of your floor. The downstairs I am leveling is over 1800 square feet! So, armed with an electronic level… I went searching for the highest spot. Since all of the walls are coming down, I put marks on the wall as I placed the level in different areas. I have two spots in my living room that I marked LEVEL 0. The plan is to level the rest of the floors to these. I used note cards to label the height differences around the house.
Step 2 – Cut zillions of shims. I started out using actual shims like you use when you put in doors and windows. Yikes… it would cost me a fortune. So, I got sheets of 1/8 inch, 1/4 inch, 3/16 inch, 1/2 inch, 5/8 inch and 3/4 inch sheeting. I cut the sheets down into pieces about 2 inches by 4 inches. I also got a sheet of formica that is about 1/16 of an inch thick and cut it into pieces too.
Step 3 – Cut oodles of support strips. I also ripped sheets of 1/2 inch, 5/8 inch and 3/4 inch sheets of plywood to run on top of the floor joists. (It sounds confusing… but in a bit you will see how simple it is.)
Step 4 – Find and mark where the floor joists are. I want to run a shimmed wood strip directly above the floor joist. So, I went into the basement and drilled a 1/8 inch hole to the side of each of the joists. Next, I marked a line where each joist was with a permanent felt pen. (I tried using a chalk line… but even though I tried 3 different colors, I could never see the line clearly.) I just put a straight 2×4 down and used it as a straight edge.
Step 5 – Setup the laser level. I ended up putting it at the exact level I wanted the BOTTOM of the sub-floor.

Step 6 – Start shimming. Next, I stacked shims up to the height of the laser beam. (Less the thickness of the support strip. The support strip varied based on the how much the floor varied) I glued the shims in place. I put shims every 8 inches. (But, every 16 inches would probably work fine.)
Step 7 – Glue and nail the support strips in place. Then, I lined up the support strips so they were over the floor joists and glued and nailed them into place.
Step 8 – Screw down the sub-floor. The last step was to put down the 3/4 inch sheets of tongue and groove sub-floor. I ended up using OSB rather than plywood. There is an interesting “battle of the best sub-floor” argument going on on the internet. In my opinion OSB is winning… but many people have STRONG opinions on each.
Screws – I used super long screws through each spot where the shims were. I wanted the screw to be able to go through the sub-floor, the support strips, the shims, the old sub-floor and into the joist. So, I used from 3 1/2 inch to 5 inch screws.


Recent Comments